How to Set Up Shipping in Squarespace (2026)
A note on pricing: all prices mentioned in this post are accurate as of the date this article was written, but can change at any time. This includes Squarespace plans, third-party tools, plugins, templates, and any other services referenced. Always check directly with the provider for the most current pricing before committing.
This post contains affiliate links. If you purchase through them, I may receive a small commission at no extra cost to you.
This article was researched and fact-checked for all information provided from primary sources (Squarespace Help Docs) and is up to date as of June 2026. AI was not used as a source.
Table of Contents Show
How do you set up shipping on Squarespace?
Quick Answer: To set up Squarespace shipping, go to Settings > Selling > Shipping in your site's settings panel. From there you can create flat rate shipping rules, enable carrier-calculated rates (Core plan and above), or offer free shipping. You'll set up shipping zones by region, assign rates to each zone, and choose how those rates are calculated. The whole process takes about 15-20 minutes once you know what you want to charge.
KEY SQUARESPACE SHIPPING FACTS:
Shipping settings live under Settings > Selling > Shipping
Flat rate shipping is available on all Squarespace plans
Carrier-calculated shipping (real-time rates from USPS, UPS, FedEx) requires the Core plan or above
You can create shipping zones by country or region and assign different rates to each
Free shipping can be set up as its own shipping option or triggered by a minimum order amount
Weight-based and price-based shipping rules let you scale rates as orders get larger
Shipping profiles (called fulfillment profiles in Squarespace) let you assign different shipping rules to different products
Before You Touch Any Settings
The fun part of setting up your Squarespace shop is picking your photos, writing product descriptions, making everything look great. The not-so-fun part? Shipping setup. But spending 15 minutes getting this right upfront saves you from a LOT of headaches later; like customers abandoning their carts because the shipping cost surprised them, or you eating the cost on a heavy package because your flat rate was too low.
So before you start clicking around in your Squarespace dashboard, take a few minutes to figure out three things:1. Where are you shipping to?
Domestic only? International? Specific countries? This will determine your shipping zones.
2. How do you want to charge for shipping?
Flat rate (same price regardless)? By weight? By order total? Real-time carrier rates? Free shipping over a certain amount? You don't have to pick just one; you can combine these.
3. What are you actually shipping?
A 4oz sticker pack and a 15lb ceramic vase need very different shipping setups. If all your products are roughly the same size and weight, flat rate keeps things simple. If they vary a lot, weight-based or carrier-calculated rates will be more accurate.
Once you have those answers, the setup goes pretty fast.
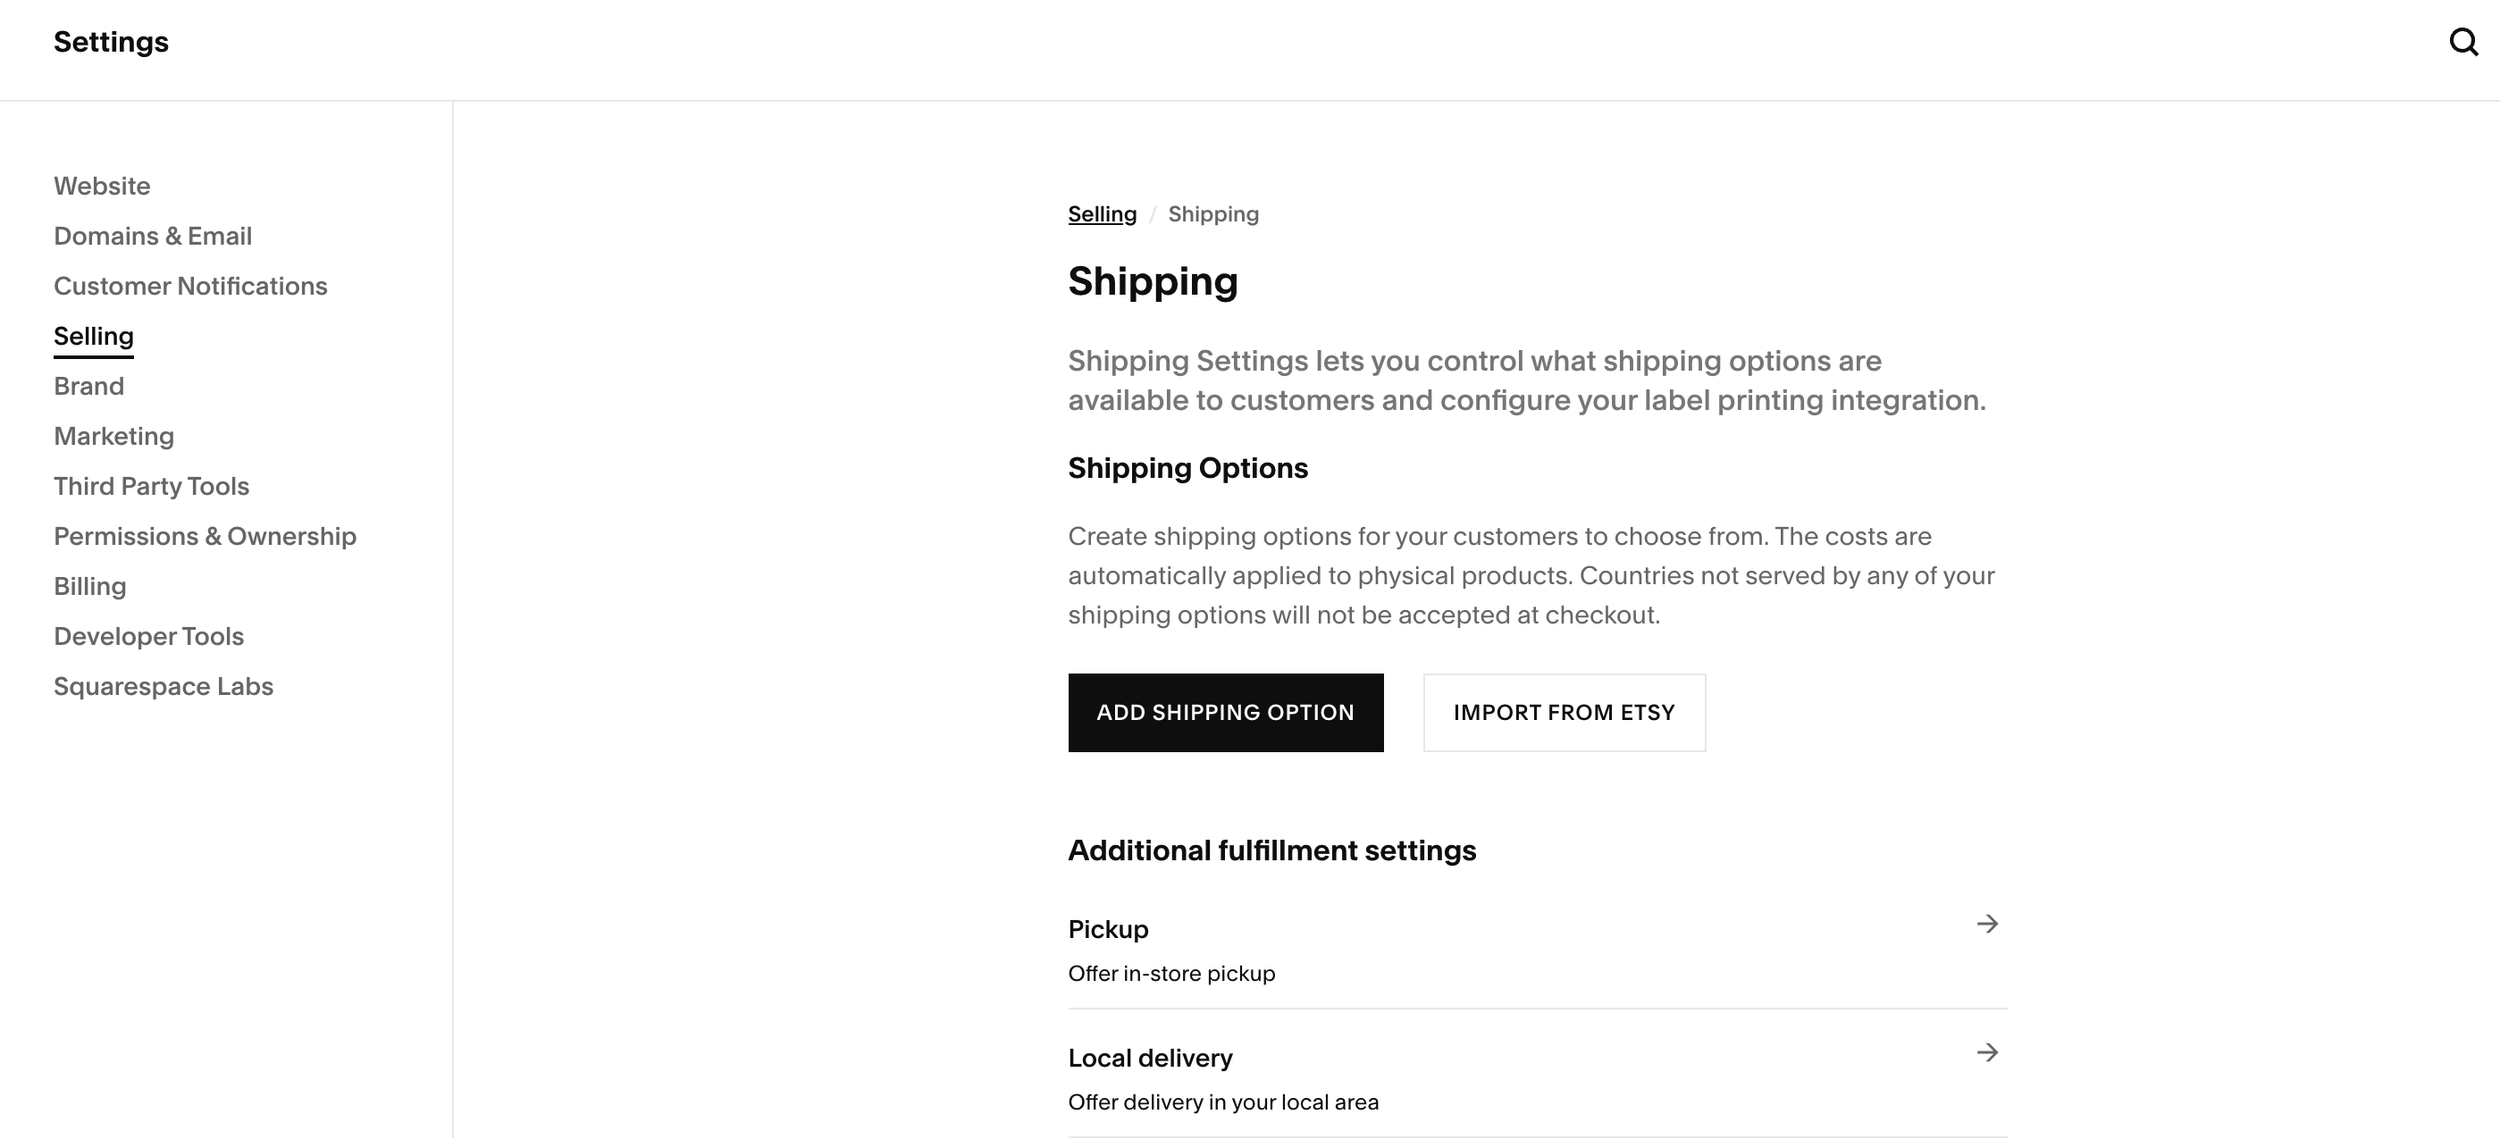
First thing’s First: Getting to Your Shipping Settings
From your Squarespace dashboard, click Settings in the left-hand panel
Click Selling, then click Shipping
You'll see your shipping options here; this is where everything lives
Setting Up Shipping Zones in Squarespace
Shipping zones are how you tell Squarespace where you ship and what to charge for each region. You create a zone, assign countries or regions to it, and then set the shipping rate for that zone.
To create a shipping zone:
In your Shipping settings, click to add a new shipping option
Give it a name your customers will see at checkout (like "Standard Shipping" or "US Ground Shipping")
Select the countries or regions this zone covers
Set your rate for that zone (more on rate types below)
You can create as many zones as you need. A common setup is:
Zone 1: Domestic (your home country)
Zone 2: Canada/Mexico (if you ship there)
Zone 3: International (everywhere else you ship to)
Pro Tip: Be specific with your zone names at checkout. "Shipping" is vague. "Standard Shipping (5-7 business days)" tells your customer what they're paying for and sets expectations. That small detail can reduce "where's my order?" emails.
Shipping zone article on Squarespace
Choosing Your Rate Type
There are a few different ways to calculate what customers pay for shipping. Here's each option and when you'd want to use it.
Flat Rate Shipping
The simplest option. You set one price, and that's what every customer pays for shipping in that zone. Period.
When flat rate works well:
Your products are all roughly the same size and weight
You want checkout to be predictable and easy for customers
You're willing to occasionally over- or under-charge slightly for the sake of simplicity
When it doesn't work well:
You sell products with wildly different weights (like jewelry AND furniture)
You ship internationally and costs vary dramatically by destination
To set a flat rate, just enter the dollar amount when configuring your shipping zone.
Flat rate shipping article from Squarespace
Weight-Based Shipping
With weight-based rates, you set price tiers based on the total weight of the order. So an order weighing 0-1 lb might cost $5 to ship, 1-3 lbs might cost $8, and so on.
For this to work, you need to enter the weight for every physical product in your store. Go to each product's editing page, find the shipping section, and add the weight there. If you skip this step, Squarespace can't calculate the rate and your customer might not see a shipping charge at all (which means you're eating that cost). Which sucks.
Pro Tip: Weigh your products PACKAGED, not just the item itself. That box, bubble wrap, and packing peanuts add up. If you're estimating, round up slightly. It's better to overestimate by a few ounces than to consistently lose money on every shipment.
Price-Based Shipping
Instead of weight, you base the shipping cost on the order total. For example: orders under $50 pay $6 shipping, orders $50-$100 pay $4, orders over $100 get free shipping.
This is a great option if you don't want to bother weighing every product, or if you're more focused on encouraging larger orders than recouping exact shipping costs.
Carrier-Calculated Shipping
This pulls real-time rates from carriers like USPS, UPS, and FedEx based on the package weight, dimensions, and destination. Your customer sees the actual shipping cost at checkout.
The big caveat: carrier-calculated shipping requires the Core plan or above. It's not available on the Basic plan.
When this makes sense:
You ship products with very different sizes and weights
You want to charge customers exactly what shipping costs you (no more, no less)
You ship internationally and don't want to guess at flat rates for dozens of countries
When it might not be worth it:
If all your products are similar in size and a flat rate would be close enough
If you'd rather absorb small shipping cost differences for a cleaner checkout experience
To use carrier-calculated rates, you'll need to enter both the weight AND dimensions for each product. The more accurate your product info, the more accurate the rates your customers see.


How to Set Up Free Shipping in Squarespace
People HATE paying for shipping. (Even when the product price is higher to compensate. It's not rational, but it is extremely real.) So free shipping is probably the single most effective thing you can do to reduce cart abandonment.
You have a couple of ways to set up free shipping in Squarespace:
Option 1: Free shipping on everything
Create a shipping option, set the rate to $0, and assign it to your zones. Done.
Option 2: Free shipping over a minimum order amount
This is the more strategic move. You set a threshold (like $75 or $100), and orders that hit that amount get free shipping. Orders under the threshold pay your normal rate.
To set this up, create a free shipping discount in Squarespace and set it to apply to orders over your chosen amount. On Core, Plus, Advanced, and Commerce Advanced plans this discount can apply automatically at checkout. Make sure you also have a paid shipping option in place for orders that don't meet the threshold.
Pro Tip: Look at your average order value and set your free shipping threshold slightly above it. If your average order is $60, set free shipping at $75. This nudges customers to add one more item to hit the threshold. It's one of the oldest tricks in ecommerce and it still works.
How to set up shipping rates from Squarepace
Fulfillment Profiles: Different Rules for Different Products
This is one of those features that's easy to miss but makes a huge difference if you sell a mix of product types. Fulfillment profiles let you assign different shipping rules to different products.
For example, let's say you sell both prints and framed artwork. Your prints are lightweight and cheap to ship; your framed pieces are heavy and require special packaging. Instead of setting one flat rate that's too high for prints and too low for framed pieces, you create two fulfillment profiles:
Profile A: "Prints" - flat rate $5
Profile B: "Framed Art" - weight-based or carrier-calculated
Then you assign each product to the appropriate profile. Customers who buy a print pay $5 shipping. Customers who buy a framed piece pay the rate that actually covers the cost.
To assign a product to a fulfillment profile, open the Products panel, click Fulfillment profiles, create or select a profile, then assign it to the product from the product editor under Fulfillment.
Don't Forget: Product-Level Shipping Details
This is the step that makes everything else work. For every physical product in your store, you should fill in:
Weight - required for weight-based and carrier-calculated rates
Dimensions (length, width, height) - required for carrier-calculated rates
Shipping profile - if you're using multiple profiles
If you leave these blank, Squarespace doesn't have the info it needs to calculate accurate rates. And "inaccurate shipping rate" is just a polished way of saying "you're either overcharging your customer or losing money." Neither is great.
A Simple Setup for Most Small Shops
If you're just getting started and feeling a bit overwhelmed by all the options (there are soooo many options), here's what an easy & straightforward shipping setup looks like:
Create one domestic shipping zone with a flat rate that covers most of your products (weigh a few, estimate generously)
Create one international zone (if you ship internationally) with a slightly higher flat rate
Add a free shipping option with a minimum order threshold to encourage larger orders
Fill in product weights for everything in your store
That's a perfectly fine starting point. You can always add complexity later; weight-based tiers, carrier-calculated rates, multiple profiles. But getting something reasonable in place is way better than leaving shipping unconfigured because the "perfect" setup felt too complicated.
Testing Your Shipping Setup
Before you start promoting your shop, place a test order. Add products to the cart, go through checkout, and make sure the shipping options show up correctly and the prices are what you expect.
Check a few scenarios:
A single lightweight item
Multiple items (does the rate scale the way you want?)
An order that hits your free shipping threshold
An international order (if applicable)
If something looks off, go back to your shipping settings and adjust. It's much better to catch a $2 shipping error NOW, than after 50 orders.
Setting Up A Squarespace Shop: Guides & Reviews


Frequently Asked Questions
Can I offer free shipping on Squarespace?
Yep! There are a couple of ways to do it. The simplest is creating a shipping option with a $0 rate and applying it to your shipping zones; that gives everyone free shipping on every order. The more strategic approach is setting a minimum order amount, so only orders above a certain threshold (like $75 or $100) qualify for free shipping. To do this, create a free shipping discount and set it to apply to orders over your chosen amount. On Core, Plus, Advanced, and Commerce Advanced plans this discount applies automatically at checkout. Keep a paid shipping option in place for orders that don't meet the threshold. A lot of store owners use the minimum-order approach to encourage larger purchases without eating shipping costs on every single order.
Does Squarespace support carrier-calculated shipping rates?
It does, but not on every plan. Carrier-calculated shipping (real-time rates from USPS, UPS, and FedEx) is available on the Core plan and above. It's not available on the Basic plan. For carrier-calculated rates to work properly, you need to enter both the weight and the dimensions for each physical product in your store. If your products vary a lot in size and weight, carrier-calculated rates are worth the upgrade because they charge your customers exactly what shipping costs. If your products are all pretty similar, a flat rate might be close enough and save you the trouble of measuring everything.
How do I set up different shipping rates for different products on Squarespace?
Fulfillment profiles! Instead of applying one shipping rule to your entire store, you create separate profiles with different rate structures, and then assign each product to the profile that fits. For example, if you sell lightweight stickers and heavy ceramic mugs, you'd create a "Stickers" profile with a low flat rate and a "Ceramics" profile with a weight-based or carrier-calculated rate. You assign products to profiles in the product editor under the shipping section. This way, customers pay a rate that reflects what they're buying instead of one-size-fits-all pricing that's too high for small items or too low for heavy ones.
What happens if I don't add weight to my products on Squarespace?
If you're using weight-based or carrier-calculated shipping and you haven't entered a weight for a product, Squarespace won't be able to calculate an accurate shipping rate for orders containing that product. Depending on how your rates are configured, the customer might see an unexpectedly low shipping charge (or potentially no charge at all), which means you'd be covering the difference out of pocket. It's one of those things that's easy to forget when you're adding products in a rush, but it's worth going through your entire catalog and filling in weights for every physical product. Weigh items in their packaging (box, bubble wrap, etc.) for the most accurate numbers, and round up slightly if you're estimating.
Do I need a specific Squarespace plan to sell physical products?
All Squarespace plans that support commerce will let you sell physical products and set up shipping. The differences between plans come down to transaction fees and features. The Basic plan charges a 2% transaction fee on physical products, while the Core, Plus, and Advanced plans have 0% transaction fees. Carrier-calculated shipping (real-time rates from USPS, UPS, FedEx) is only available on Core and above. So if you're just getting started and your shipping needs are simple, Basic works fine with flat rate shipping. But if you're selling enough volume that the 2% fee adds up, or you need real-time carrier rates, upgrading to Core is probably worth it.
